Creating augmented reality isn’t as difficult as you may expect. With our AR creator tool anyone can create augmented reality -- with no coding skills required. In part one of our augmented reality tutorials series we introduced you to scenes. Now we’re going to look at augmented reality animation.
Augmented reality tutorial for beginners: Animations
September 24, 2018
Augmented reality tutorial for beginners: Animations

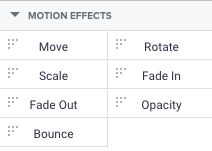
You can animate assets -- be that images, videos or 3D models -- in a number of ways. You can make them move across the canvas, rotate, fade in, fade out, bounce, and change in scale or opacity. All of these options can be found in the motion effects tab on the right hand panel. You simply need to select your asset, choose your animation, and press play to see it in action.
There are many uses for animations -- one slightly more advanced example is creating tutorials. With the right set of assets, you can create tutorials for anything you can think of -- in our example, we’ve created a health and safety demo.
How to create augmented reality animation
Step 1
Upload your assets -- to create a tutorial you will need a set of images that, when overlapped and animated, illustrate an experience. It has the same effect as flip book animation, or stop motion in Wallace and Gromit! Select the ‘Uploads’ button, choose the files you want to upload and click ‘open’ -- you can upload multiple assets at a time. Your files will appear in the assets panel on the left hand side.

Step 2
Align your assets on the same X and Y axes and make them the same scale. Just make sure they’re on different points of the Z-axis -- this axis represents the depth of the asset in 3D space. Multiple assets can’t occupy the same position on the Z-axis.

Step 3
Add animation to your assets -- these can be found by expanding the ‘Motion Effects’ tab in the bottom right corner. In this example, we want the first image of the tutorial to fade in and then fade out as the next image in the animation fades in, and so on, to give the impression of the figure moving. To do this, select the asset you’re animating and drag-and-drop the ‘fade in’ motion effect onto the animation timeline.

Step 4
Use the animation timeline to create your animated experience -- you can click-and-drag each individual motion effect to change its length, or enter in a specific length of time. Arrange the motion effects on the animation timeline so that your animation runs in the correct order. Click the ‘play’ button to see how your animation is running.
Step 5
Repeat this process with each of your assets until you have your finished experience!
Check out the video below to see animation put into action.
Ready to move onto 3D augmented reality models? Head over to our third augmented reality tutorial.
To get started with creating augmented reality, sign up to our AR creator tool for a free trial, and visit our support hub for more tutorials. We look forward to seeing what you create!


